Windows
Hier findest du Anweisungen für die manuelle Installation von evcc auf Windows.
Diese manuelle Installation erfordert fortgeschrittene PC Kenntnisse, vor allem auch im Umgang mit einem Terminal/Eingabeaufforderung.
Es ist auch möglich evcc auf Windows zu installieren. Allerdings wird evcc typischerweise in einer Linux-Umgebung (z.B. Raspberry Pi) verwendet.
Installation
-
Lade die entsprechende Datei für dein System herunter
- 64-Bit Intel CPU: evcc_X.XX_windows_amd64.zip
-
Entpacke die heruntergeladene Datei (z.B. per Doppelklick auf die Datei)
-
Es gibt nun einen neuen Ordner mit dem Programm
evcc. -
Öffne ein Terminal/Eingabeaufforderung und gehe in den Ordner mit dem Programm
evcc -
Prüfe die Installation mit folgendem Befehl:
evcc -v -
Du solltest nun die aktuelle Version von evcc sehen (z.B.
evcc version 0.xxx.y).
Konfiguration
evcc kann auf zwei Arten konfiguriert werden:
Weboberfläche (empfohlen)
Starte evcc ohne weitere Parameter:
./evcc
Öffne dann deinen Browser unter http://localhost:7070:
- Du wirst aufgefordert ein Administrator-Passwort zu vergeben
- Anschließend kannst du deine Geräte direkt über die Weboberfläche einrichten
- Die Einstellungen werden automatisch in der Datenbank gespeichert
Konfigurationsdatei (traditionell)
Alternativ kannst du eine evcc.yaml Konfigurationsdatei verwenden.
Details zur Erstellung der Konfigurationsdatei findest du unter Einrichtung.
Starte evcc mit:
./evcc -c evcc.yaml
Aktualisierung/Downgrade
Führe die obigen Schritte aus und ersetze die evcc Programmdatei mit der neuen bzw. vorherigen Version. Die Konfiguration muss nicht erneut durchgeführt werden.
evcc als Hintergrunddienst
Diese Dokumentation geht davon aus, dass evcc in c:\evcc liegt.
Diese Anweisungen wurden mit Windows 10 erstellt.
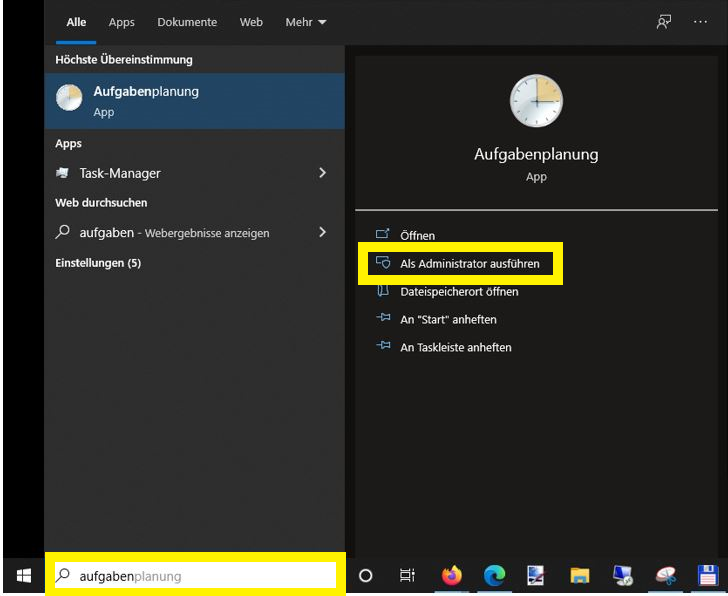
- Beginnt in der Suchleiste von Windows 10 mit der Eingabe des Wortes
Aufgabenplanung. Bereits nach wenigen Buchstaben sollte diese als Treffer mit der höchsten Übereinstimmung angezeigt werden und kann auf der rechten Seite mitAls Administrator ausführengestartet werden:
- Nach dem Start der Aufgabenplanung obliegt es dir, ob du den neuen Service in einem eigenen Ordner oder der allgemeinen Aufgabenplanungsbibliothek anlegst.
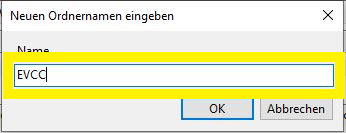
Für dieses Beispiel wird ein eigener Ordner
evccangelegt. Hierzu muss zunächst der Ordner "Aufgabenplanungsbibliothek" angewählt werden, um dann mit der rechten Maustaste das PopUp-Menü zu starten. Hier wählst duNeuer Ordnerund benennst diesen evcc:
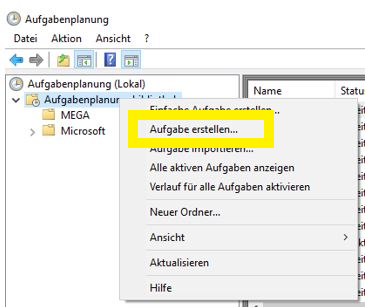
- Nun wählst du den neuen Ordner
evccoder die allgemeine Aufgabenplanungsbibliothek aus und öffnest erneut mit der rechten Maustaste das PopUp Menü, dort wählst du nunAufgabe erstellen:
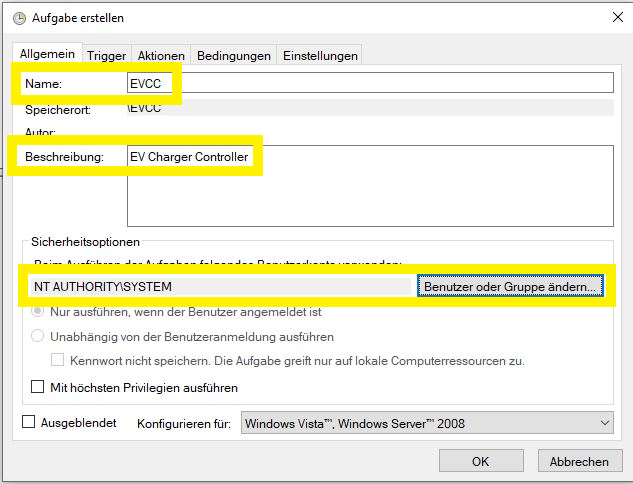
- Als Name
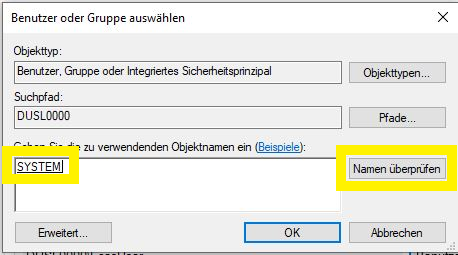
evccund zur besseren Zuordnung sollte eine kurze Beschreibung mit angegeben werden. Da du den Service als Systemdienst laufen lässt, öffnest du die Userverwaltung über 'Benutzer oder Gruppe ändern' und tippst dortsystem. Nach einem Klick aufUser überprüfen, sollte der Account angezeigt und der Dialog kann mit OK geschlossen werden:
- Einstellungen des Reiters:
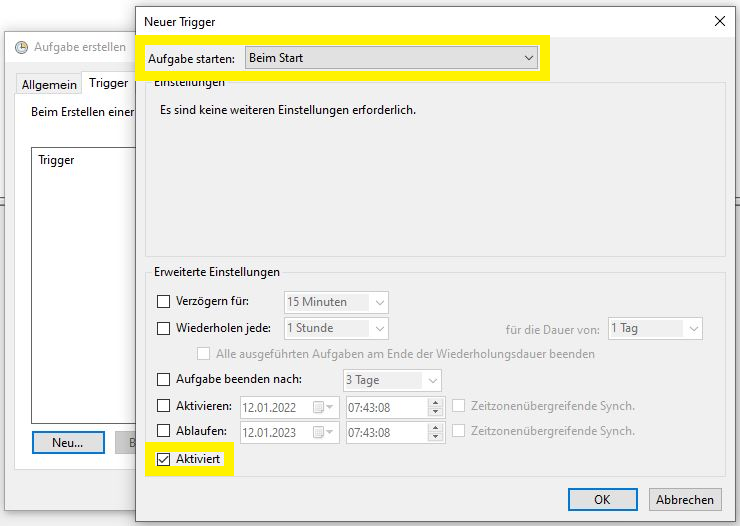
Trigger - Aufgabe starten ändern auf "Beim Start" und prüfen, dass die Aufgabe aktiviert ist:
- Einstellungen des Reiters:
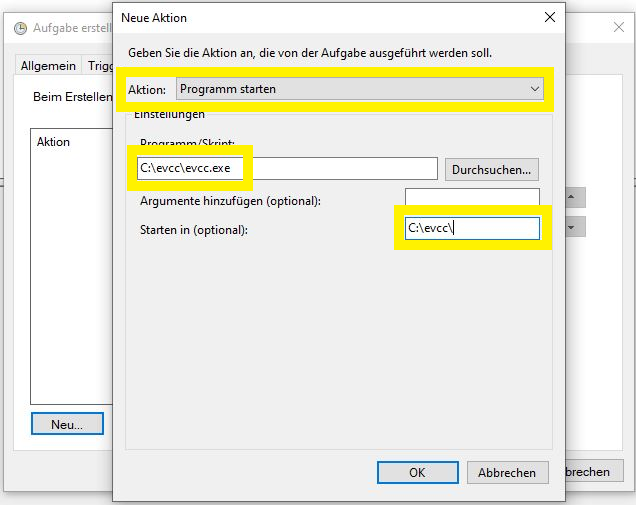
Aktionen - "Programm starten" belassen und über Durchsuchen die Datei "evcc.exe" auswählen.
Es empfiehlt sich den Pfad zusätzlich in
Starten inanzugeben, somit wird die dort abgelegte Konfigurationsdatei direkt gefunden:
- Einstellungen des Reiters:
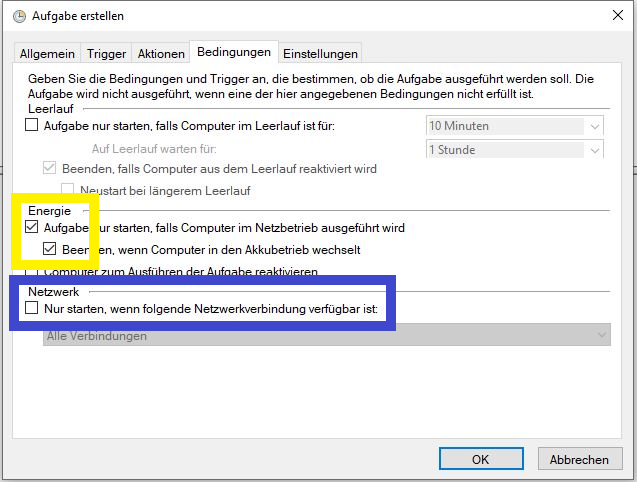
Bedingungen - Diese Einstellungen können im Default belassen werden.
Da evcc länger laufen sollte, als es der Akkubetrieb gewährleisten würde.
info
Da z.B. der SMA Home Manager über WLAN Probleme bereiten kann, sollte optional der Haken bei
Netzwerkgesetzt und eine entsprechende Verbindung ausgewählt werden.
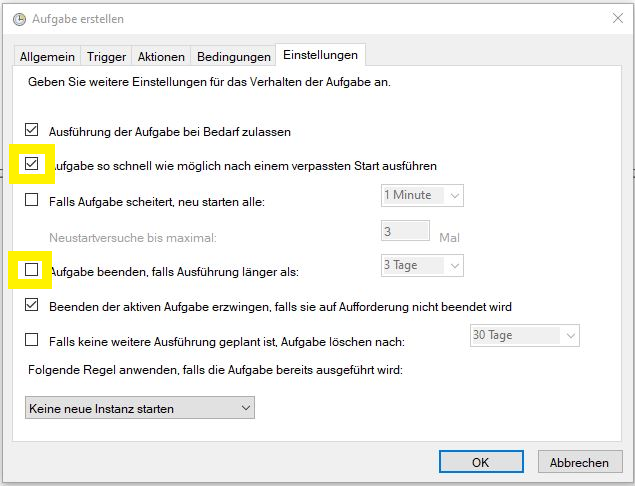
- Einstellungen des Reiters:
Einstellungen - Den Haken bei
Aufgabe so schnell wie möglich ...setzen. - Unbedingt den Haken bei
Aufgabe beenden, falls Ausführung länger als:entfernen, sonst wunderst du dich, das evcc auf einmal nicht mehr läuft.
- Du bist fertig! 🎉
Die Aufgabe kann nun manuell gestartet oder über einen Reboot getestet werden.
Zur Kontrolle mit dem Browser auf http://[IP-Adresse]:7070 zugreifen.